10. Forms
HTML Forms
One of the most common uses for HTML forms is to allow users to submit data, such as messages, feedback, or files. Many websites have a contact form that allows visitors to submit information to the site owner. The data that the user submits is emailed to the owner, submitted to a database, or both.
There are 3 basic components of HTML forms:
<form>element- form controls
- form handler
The Form Element
All of the components of a form must be inside the <form> element.
Basic structure of an HTML form:
<form method="post" action="form_processor.php">
  <input type="text" name="something">
  <input type="submit" value="submit">
</form>
Output:
![]()
Form Attributes
Method
The method attribute may have a value of get or post. It is identifying what method will be used for processing the data when the form is submitted.
| value | description |
|---|---|
method="get" | The data will be passed in the URL, such as:
|
method="post" | The data will be passed "in the background" to a programming script for processing. |
Action
The value for the action attribute specifies where the form data should be sent when the form is submitted.
The value can be either an absolute or relative URL.
In the example below, a file on the server named form_processor.php will be used to process the data.
<form method="post" action="form_precessor.php">
However, we will not learn PHP programming in this course. For your practice exercise, you could omit the action attribute or use a free form processing service. Services like this do not require any server-side programming knowledge.
Form Controls
The form controls are the elements that are used to create the text fields, checkboxes, buttons, etc. for users to input the data.
The <input> element is used along with the type attribute to create several form controls.
text input type
It creates a text box for a single line of text.
<input type="text" name="something">
Most form elements will require a name attribute. We'll discuss names further along in this lesson.
Output:
text input attributes:
| attribute | description |
|---|---|
size | Can be used to define the width of the text box based on number of characters entered as a value.
|
maxlength | The maximum number of characters that may be entered in the field.
|
required | The user must enter a value in order to submit the form.
|
placeholder | To provide text in the field:
Output: |
radio input type
Creates circular buttons that can be clicked to select options. You would use a radio when you want the user to make only one selection.
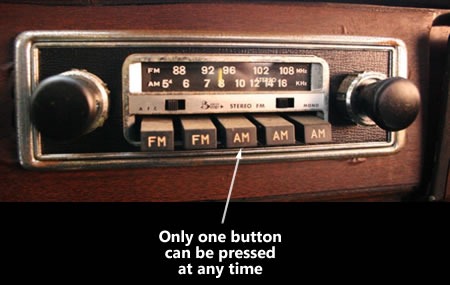
<input type="radio" name="color" value="red">
<input type="radio" name="color" value="green">
<input type="radio" name="color" value="blue">
Output:
Click them. Notice that you can only select one option at a time.
Also notice that the name is the same for each radio input, but the values are different. We'll talk about names and values here in a little bit.
radio input attributes
| attribute | description |
|---|---|
value | The text that will be sent to the server if this radio button is selected.
|
required | The user must select this input in order to submit the form.
|
checked | The input will be selected by default.
|
checkbox input type
Creates checkboxes that allow users to make multiple selections.
<input type="checkbox" name="colors" value="red">
<input type="checkbox" name="colors" value="green">
<input type="checkbox" name="colors" value="blue">
Output:
Click them. Notice that, unlike radio inputs, you can have multiple options selected at once.
checkbox input attributes
| attribute | description |
|---|---|
value | The text that will be sent to the server if this checkbox is selected.
|
required | The user must select this input in order to submit the form.
|
checked | The input will be selected by default.
|
submit input type
Creates a button that allows the user to submit all of the information that was entered into the form.
<input type="submit" value="Submit">
The value is the text that will display on the button.
reset input type
Creates a button that allows the user to clear all of the data entered into the form.
<input type="reset" value="clear form">
There are some use cases, but a reset is not necessary for most forms. Sometimes users may confuse the reset button for the submit button and all of their data is accidentally cleared.
hidden input type
Hidden fields, as the name implies, are not seen by the user. They are used to submit some type of additional data.
<input type="hidden" name="form-id" value="site-contact">
textarea
The <textarea> element allows for the creation of large text fields (paragraphs of text).
<textarea name="message"></textarea>
Output:
textarea attributes
| attribute | description |
|---|---|
rows | Specifies the height of the text area in rows.
|
cols | Specifies the width of the text area in characters.
|
placeholder | To provide text in the field.
|
required | The user must enter a value in order to submit the form.
|
Select Lists
The <select> element is used in conjunction with <option> elements to create a dropdown list of items that may be selected.
<select name="color">
    <option value="red">Red</option>
    <option value="green">Green</option>
    <option value="blue">Blue</option>
</select>
Output:
select attributes:
| attribute | description |
|---|---|
required | The user must select an option in order to submit the form.
|
multiple | The user may choose more than one option.
|
size | The value represents the height (in lines) of the select list.
Output: |
option attributes:
| attribute | description |
|---|---|
value | Text that will be sent to the server if this option is selected.
|
selected | The option will be selected by default
|
Understanding Names and Values
In many cases, a form is basically like a series of questions. We're asking the user questions and they are providing answers.
The question is represented by the name attribute.
The value is the answer to the question.
For example, take a look at this HTML for a radio:
<input type="radio" name="favorite_beatle" value="John">
<input type="radio" name="favorite_beatle" value="Paul">
<input type="radio" name="favorite_beatle" value="George">
<input type="radio" name="favorite_beatle" value="Ringo">
The name (or question) is the same for each.
The value (or possible answer) is different for each.
When the data is passed to a script to process your form, it is in this form:
favorite_beatle=John
So, think about that when creating your forms. It is a common mistake to provide a different name for the same "question".
Also note that some form elements don't require a value attribute. However, a value is still submitted. For example, a value is not required for a textarea, but the text the user enters will be sent as the value.
Form Labels
So the user knows what type of data they are to input in each field, we need to add labels to our form items. For accessibility purposes, we should use the for attribute to associate each label with its form item.
In order to use the for attribute, we must add an ID to each of the elements.
<form method="post">

  <label for="first-name">First Name</label>
  <input id="first-name" name="first-name" type="text">

  <label for="color">Favorite Color</label>
  <select id="color" name="color">
    <option value="blue">Blue</option>
    <option value="red">Red</option>
    <option value="green">Green</option>
  </select>

<input type="submit" value="submit">

</form>
Output:
![]()
for Attributes
Associating the label with its corresponding form item is important for accessibility. It makes sure that assistive technology has the information needed to provide the best experience to those with impairments.
The for attribute is used to associate a label with its form control. For example:
<label for="flyswatter">fly swatter</label>
<input type="text" id="flyswatter" name="whatever">
for="flyswatter" means that this is the label for the element that has an ID named "flyswatter".
Don't forget that each ID in a page needs to be unique.
When a label has been correctly associated with the form item, you should be able to click on the label to select the item. Click on the word "taco" below:
This improves usability and accessibility. There is a larger clickable area when you associate the label with the form item. This is especially helpful for those with dexterity issues.
It is properly associated because I have used the ID for the radio as the value for the label's for attribute:
<label for="taco">Taco</label>
<input type="radio" id="taco" name="food" value="taco">
You can also associate the label with the form item by nesting the form item inside the label. When you use this technique, a for attribute is not required:
<label>Taco <input type="radio" name="food" value="taco"></label>
Fieldsets & Legends
When creating forms with several elements, organizing the form into sections may be helpful. Like items may be arranged into fieldsets to provide organization. The legend is used to provide labels for the fieldsets.
<form method="post">

  <fieldset>

    <legend>Basic Information</legend>

    <label for="first-name">First Name</label>
    <input id="first-name" name="first-name" type="text">

    <label for="color">Favorite Color</label>
    <select id="color" name="color">
      <option value="blue">Blue</option>
      <option value="red">Red</option>
      <option value="green">Green</option>
    </select>

  </fieldset>

  <fieldset>

    <legend>Other Information</legend>

    <label for="pet-name">Name of Pet</label>
    <input id="pet-name" name="pet-name" type="text">

    <label for="type-pet">Type of Pet</label>
    <select id="type-pet" name="type-pet">
      <option value="cat">Cat</option>
      <option value="dog">Dog</option>
      <option value="toad">Toad</option>
    </select>

</fieldset>

<input type="submit" value="submit">

</form>
Output:

Legends for labeling radio and checkbox questions
When you use radios and checkboxes, you will usually have some text describing what question is being asked, followed by several options.
We could use the label element for this text. But we wouldn't be able to use the for attribute because there is no corresponding ID for associating the label with the form items.
The solution is to use a fieldset with a legend. Since these are all together in a fieldset with a legend, it properly associates the question with the possible answers:
<fieldset>

  <legend>What is your favorite color?</legend>

  <label for="blue">Blue</label>
  <input type="radio" id="blue" name="color" value="blue">

  <label for="red">Red</label>
  <input type="radio" id="red" name="color" value="red">

</fieldset>
Styling Forms with CSS
Without any styling, the form items will line up side-by-side because they are inline elements (Although fieldsets are block-level elements as you can see above).
You can use the <br> element to make elements go to the next line. This isn't really the best practice way to do it, but it's fine when first learning.
The best way to handle this is to use CSS. See the code in this Practice 10 example and this second Practice 10 example.
It is nearly impossible to get forms to look identical in all browsers and operating systems. A form item on a Mac is going to look different from one on a Windows PC. With a little work, you can create professional looking forms that are easy to use. However, truly mastering the art of form design requires a bit of experience. It is not expected that you will be able to create elegant forms after completing an introductory course.
CSS Selectors for Forms
Just like any element, you can add classes and/or IDs to form elements in order to apply styling. Additionally, you may use the names of elements such as input, fieldset, form, etc. for styling.
There is another method that may be utilized that we have not discussed yet: Using attributes and their values to create CSS selectors.
input[type="text"] {
  width: 10em;
  margin-bottom: .6em;
  background-color: #E9E9E9;
}
This method eliminates the need to add any additional classes in the HTML for styling purposes.
Form Handlers
We can add the the name of a file in the action attribute of our <form> element. This tells the server to use the code in that file to process the form data once the user submits it.
<form method="post" action="form_precessor.php">
The form handler takes the submitted data and does something with it, such as sending the data in an email, uploading it to a database, or writing it to a file on the server.
Additionally, it may be used for input validation to make sure everything was entered correctly. It may also provide the submitter with a confirmation page with a summary of entered data.
For your practice exercise, you could omit the action attribute, since we have not learned the server-side programming skills required for this.
Or you could use a free form processing service. Services like this do not require any server-side programming knowledge.
Form Validation
Don't confuse form validation with HTML and CSS code validation. Those are different concepts.
Form validation is used to run some type of test on the data that is submitted by the user.
It is important to test this submitted data to make sure it is complete, appropriate, and does not do something malicious.
For example, you might require that a certain field is completed. Maybe you will absolutely need the user to enter their email so you can respond. Your programming script would check to make sure the email field has been filled in before proceeding. This script should also verify that that the email address is in the correct format. For example, it might verify that it contains the '@' symbol.
Form validation is also used to handle hacking attempts and other security issues. It is important that the code used to process the form includes validation and is created by a competent programmer. It's probably not a good idea to use the first PHP script you find on the web. You should become familiar with security issues and only use scripts provided by trusted sources.
Client-side vs. Server-side validation
In order for code in a programming language to carry out the instructions you have given, the code must be interpreted.
With client-side programming languages, the interpreter runs on the user's computer.
With server-side programming languages, the interpreter program runs on the server.
So, a server-side programming language sends instructions to the server. And a client-side programming language sends instructions to the user's computer.
When you view the source code of a web page, you will never see any server-side programming code. But you can see all of the client-side code.
Validation can be performed both on the client and server sides. And they are most often used in tandem, each with their own purposes.
Client-side validation is primarily used for the convenience of the user. For example, if the user hasn't entered their email address, your client-side validation could immediately notify them of this and stop the form from submitting to the server.
The client-side validation is processed in the browser of the user's computer.
JavaScript, which we will discuss in the next lesson, is a client-side language that can be used for client-side form validation.
There are also client-side validation tools built into HTML. For example, you can use the HTML required attribute to make sure the user enters a value before the form will be submitted.
However, client-side validation can't be used to prevent hacking attempts and it can't guarantee that you'll actually receive the data that you require.
The user has control of their own computer. For example, if you are using JavaScript validation, the user could simply disable JavaScript in their browser and bypass any of your JavaScript code.
Server-side validation is necessary for security purposes and to ensure that you receive the data you want to receive.
You control your own server. Server-side languages run on your server and this can't be bypassed by the user, unless there is some problem with your code.